Spider Nest
Posted in Holiday, Kid Friendly and tagged with For Kids, Halloween on 10/06/2010 04:34 pm by ChrissySpider Nest
MATERIALS:
Plaster fabric strips (Rigid Wrap)
Large balloons (at least 11 inches)
Fishing line
Plastic spiders
Hot glue
Pin/needle
2 bowls
DIRECTIONS:
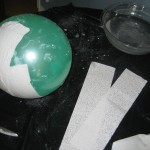
 Inflate balloon and set it in a bowl to avoid it rolling away from you. Fill a bowl of water to be used with the plaster strips. Read and follow the directions that come with the plaster strips. It is easier to use if the material is cut into pieces 8-10 inches long. With the knotted end of the balloon pointed up toward the ceiling start covering the balloon from the top working your way down and around layering each piece over each other. Don’t worry about smoothing out all the bumps as this will add texture to the finished project. Continue layering the plaster cloth around the balloon. Let dry according to the directions.
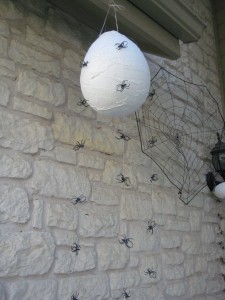
Once the plaster has dried, use a pin or needle to pop the balloon. Cut several pieces of fishing lines in various lengths. Tie the spiders onto the fishing line every 6 inches. Use a pin to make a hole at the top of the plaster mold and tie the fishing line securely allowing the spiders to hang down. To finish the project add a few spiders to the outside of the plaster form using hot glue so it looks like they are hatching and leaving the spider nest. Use fishing line or thin twine to hang the completed spiders nest.
 This project was found at http://familyfun.go.com/halloween.  For a more kid friendly version of this craft visit, http://www.ehow.com/how_4500321_make-spider-nest-halloween-decoration.html. Styrofoam balls and cotton are a simple and clean version of this creepy craft.

