Recycled T-shirt
Posted in Fashion, Gifts, Random and tagged with t-shirts on 02/24/2010 05:10 pm by ChrissyMaterials:
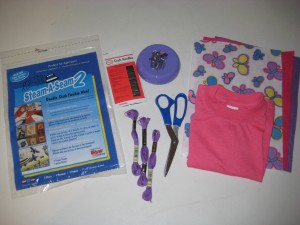
Felt ( I used felt with a butterfly pattern)
Double stick fusible web
Scissors
Pins
Embroidery thread
Embroidery needle
Iron
Ironing board
Make sure the t-shirt is washed and dried so it doesn’t shrink after you embellish it.
Start by preparing the shapes you want to add to the t-shirt. Peel the paper liner off one side of the web, and stick to the back of your felt. Trace your desired shape(s) on the back of the web. With a sharp pair of scissors, slowly cut along the shape for a clean edge.
Next, cut the inside seam along the sides and arm hole. If there is no side seam just cut straight up each side. I find it easiest if you turn the shirt inside out and follow the surged line. After each seam is cut you should have a total of 3 pieces (2 sleeves and 1 long torso with the neck whole in the middle). If you are worried that the t-shirt may pull at the side seams you can simple leave the sides together and stitch up the side.
Get your iron plugged in and heated up. Layout the shapes on your shirt to determine the right placement. Remove the web paper backing from your shape and place on the shirt. I suggest turning the shirt inside to iron to avoid the felt getting discolored. The fusing web directions tell you to use steam, but that ruined my felt. I removed the water from the iron and the web worked great. Hold the iron still on the shape for 10-15 seconds. Be careful to not move the iron around.
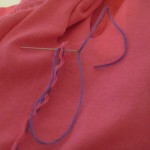 Now that the shapes are secure on your shirt it is time to reassemble the piece back together. Line up the edges of the shirt and use pins to keep together. Don’t get frustrated if the edges are rolling, it will add to the look of the shirt. Get your needle and thread. To determine how much thread you will need, simply double the length of the seam you are sewing. Thread the needle and tie off the end leaving a little extra at the top of the needle. Anytime you are starting and finishing a seam it is important to secure the ends by making a double stitch at the end (forming a loop). Start sewing up one side of the shirt using a ¼ inch stitch (in and out motion, nothing fancy here). Do each of the side first and then move on to the sleeves, first pining and then stitching.
For extra detail you can stitch around the neckline and shoulders. I loved adding a smaller shape to the arms and back of the shirt. Be creative with color combinations and varying your shapes. The t-shirt should be your canvas. Sometimes simple is better…but do what you like.
Finished shirt should be washed inside out and laid flat to dry. Avoid the dryer.
This idea was featured on She’s Crafty (ION Life Network) with guest star Teresa Findlay of “Dirty Laundryâ€.







June 29th, 2010 at 8:24 am
Thank you for posting this. I saw the idea of She’s Crafty but needed a little more instruction.
June 29th, 2010 at 4:16 pm
Glad to help. Hope your t-shirt comes out cute like mine did. If you have any other projects you see that you need more details on, send them my way.
August 12th, 2010 at 12:53 pm
Thank you so much for posting this. I saw it on tv yesterday and really wanted to try and make them as christms gifts but need a little more specific instructions..THANKS!
February 25th, 2011 at 2:05 pm
[…] write the directions down, assuming I could fine them online. I eventually found a tutorial for a recycled t-shirt based on the episode, and I cross-referenced this with the actual t-shirts on the Dirty Laundry […]